L-702SP 5-Axis Machine Tool & Spindle Alignment System
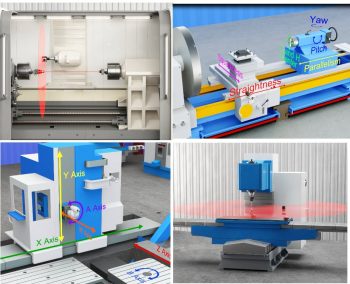
Many machines, one laser! The L-702SP 5-Axis Machine Tool and Spindle Alignment system is a powerful and versatile alignment system that is highly accurate, fast and easy to set up and can be used for many different machine tool applications. Its unique design makes it especially useful on difficult-to-align multiturn machines and 5-axis horizontal boring mills.
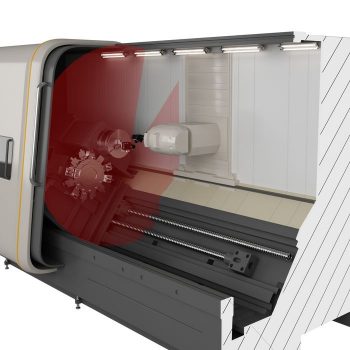
The L-702SP is mounted directly into a spindle chuck and the laser beam aligned to it’s rotation axis. A perpendicular scan plane then measures other axes for squareness and straightness. It also features our T-1295 5-Axis Target that measures straightness, spindle alignment and pitch/yaw angular values for the linear axes. Or use our optional T-1296 Hi-Resolution 5-Axis Target for double the resolution and accuracy!
It’s very easy to set up and use. For example, it only takes 2 setups to measure all the axes of a multiturn machine!
System Highlights
- Fast: Easy setups let you do a quick alignment check in 15 minutes and get full alignment data in 25-30 minutes on most machines.
- Easy: Laser and target mount directly into the spindle and tailstock, respectively, allowing the entire length of even the largest lathes to be quickly and easily aligned without changing setups, replacing cumbersome and impractical alignment test bars.
- Accurate: Ultra-high resolution of up to .00001 in. (0.00025 mm) combined with software to correct mounting errors produces a very accurate alignment, less than .0001 in. (0.0025 mm) and .0001 in/ft (0.0083 mm/m) under good environmental conditions.
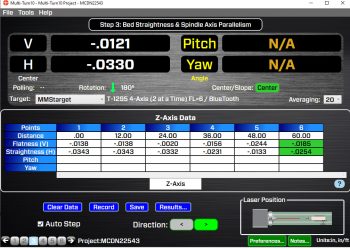
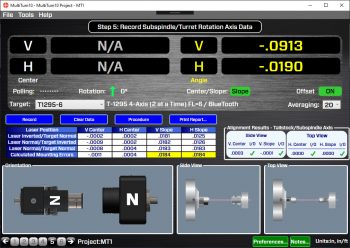
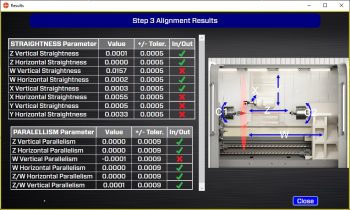
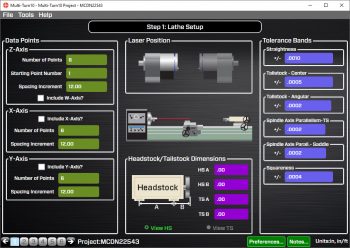
- MultiTurn10 Software: Large, easy-to-see alignment displays, real-time alignment data and spindle graphics, and a 6-step procedure guide users through the alignment with on-screen help instructions. MultiTurn10 records data for all axes of multiturns, lathes, turning center and some machining centers, calculating straightness, flatness and squareness results and providing a comprehensive report on the alignment of the machine tool.
- Built-In Squareness Capability – A perpendicular laser can plane can easily measure the squareness of linear axes without additional setups.
Key Features
- L-702SP mounts directly in the spindle to project its axis of rotation out to 100 ft (30 m).
- It can also mount on the L-702MB Mag Base Fixture for measuring flatness of surfaces.
- The laser and target both offer a .4995 in. (12.69 mm) mounting stud for simple fixturing to hold them in place.
- T-1295 5-Axis Target has resolution of .00002 in. (0.0005 mm) and angular (standard) resolution of .00008 in/ft (0.007 mm/m). Optional T-1296 Hi-Resolution Target has with 2x better center/angular resolution.
- Real-time measurement data in 4 axes (V center, V angle, H center & H angle).
- Measures pitch and yaw angular data for linear axes with a standard resolution of .00008 in/ft. (0.007 mm/m). Hi-resolution optic provides .00004 in/ft. (0.0035 mm/m).
- Windows 7/8/10-based MultiTurn10 Software with large, color graphics corrects mounting errors, calculates shim values and provides an alignment report showing all the alignment parameters of lathe alignment.
- Vertical and horizontal angular adjustments to precisely adjust the laser to the spindle’s axis of rotation or to align laser plane to reference points.
- Rechargeable LiPo battery runs the lasers for up to 8 hours.
- Compact and rugged 4 x 2.9 x 1.7 in. (101 x 74 x 45 mm).
- Only needs 10 in. (254 mm) of space between spindle and tailstock or sub-spindle.
If you do not see your application listed, please contact us to discuss your requirements. We will be more than happy to provide a solution that’s right for your unique alignment problem.
Applications
- CNC Horizontal Boring Mills
- CNC Horizontal and Vertical Machining Centers and Gantries
- CNC MultiTurn Machining Centers
- Cylindrical, OD/ID Grinders
- Horizontal Boring Mill Indexing Checks for Deep-Bore Applications
- Injection Molding Machines
- Lathes & CNC Turning Centers
- Rotary-Dial Machines
- Squareness of Bores to Flanges
Many Machines, One Laser
The L-702SP laser kit can align many different kinds of machines from boring mills to lathes even injection molding machines. It is especially useful on smaller, enclosed machine tools due to is small size and ability to mount directly in the spindle.
Complicated Lathe Alignment Checks Done with Ease
Measure headstock spindle-axis parallelism with the lathe-bed and saddle guide-rails, headstock-to-tailstock alignment and spindle-to-subspindle alignment. With a measuring range of up to 65 feet (20 m), even the longest lathe bed is easy to measure for parallelism to the spindle axis, eliminating the need for expensive and heavy test bars.
High Resolution and Accuracy Improves Part Quality
The L-702’s ultra-high resolution of .00002 in. (0.0005 mm) combined with MultTurn10 software to correct mounting errors produces a very accurate alignment, less than .0001 in. (0.0025 mm) under good environmental conditions. This extremely high level of accuracy can dramatically improve machine performance and reduce scrap rates.
5-Axis Alignment Targets
Our T-1295/T-1296 5-Axis Wireless Targets are designed work with our L-702SP Spindle/Machine Tool Laser. With Bluetooth communication and multiple measuring axes, the T-1295/T-1296 targets are multi-purpose targets that can be used for many different applications. The target offer these 3 measurement modes (5 axes):
- Center Mode – 2-axis center measurement for use with the L-702SP’s through-beam.
- Angular Mode – 2-axis angular (pitch/yaw) measurement for use with the L-702SP’s through-beam.
- Flatness (Scan) Mode – single-axis flatness measurement for use with the L-702SP’s auto-rotating laser scan plane.
Measure Cross-Slide or Machining Axis Squareness with Ease
Use the L-702SP Spindle Laser, with it perpendicular scan plane, and our T-1295 5-Axis Target switched to Scan Mode to measure the straightness/squareness of the cross slide, turret travel or machining axes on multi-turn machines. It takes just 2 setups to check all the axes of a multiturn machining center!
Real-Time 4-Axis Data Speeds Alignment by 70%
The T-1295 5-Axis Target’s alignment values update in real time, so without changing the setup, alignment errors can be quickly fixed, while watching the software’s displays up date each adjustment. MultiTurn software also quickly collects the lathe bed’s straightness data, analyzes it, recommends shim and moves values for headstock and tailstock alignments. In most cases, alignment times can be reduced by 60-70%.
Alignment Data in 15 Minutes
The L-702SP 5-Axis Alignment System is so easy to set up that you can do a quick alignment check in 15 minutes and the full alignment data in 25–30 minutes on most machines – even multiturns. Our MultiTurn10 Software even corrects for mechanical mounting errors to provide the most accurate lathe alignment on the market today!
MultiTurn10 Built-In, 6-Step Alignment Procedure
An easy-to-follow, 6-step alignment procedure is built right into MultiTurn10, along with popup instructions, that makes what can be a complicated alignment much simpler and easier to learn. Large color graphical displays allow the alignment data to be seen up to 20 feet (6.5 m) away.
Downloads
- L-702SP 5-Axis Machine Tool & Spindle Alignment System Brochure – Rev D6
- T-1295-T-1296 5-Axis Wireless Target Datasheet – Rev A7
- L-702SP System Accessories Datasheet – Rev A3
- L-702SP 5-Axis Machine Tool & Spindle Alignment System – How it Works – Part 1 – Laser Setup and Measuring Machining Axes – Rev A
- L-702SP 5-Axis Machine Tool & Spindle Alignment System – How it Works – Parts 2&3 Spindle Alignment and B-Axis Checks- Rev A
- S-1407 MultiTurn10 Software Manual – Rev A2
- S-1407 Multiturn Software Datasheet – Rev-A3
- A-1519/A-1520-2.4ZB Type II Wireless Target Datasheet – DISCONTINUED
- Call Us: +1-203-730-4600
- Email: sales@hamarlaser.com
- Website: www.hamarlaser.com
- L-700 Lathe Alignment System
- L-702SP 5-Axis Machine Tool & Spindle Alignment System
- L-703 Bore, Spindle & Straightness Laser Alignment Systems
- L-705 Bore Alignment Laser System
- L-706 Bore Laser System
- L-706 Small-Bore Alignment Laser System
- L-708 Internal Bore Laser Systems
- L-730 Precision Leveling Laser
- L-732 Precision Dual Scan® Laser


